-
Tie-dyed eggs two ways!

We made tie-dyed eggs yesterday. It was SO fun! I definitely recommend following this beautiful tutorial from ourbestbites.com. I found the link via goodyblog. Those parenting websites are great for finding fun things to fill up dull afternoons.
I have to share here because it’s super-fun and super-easy and it would be tragic if you didn’t rush out and try this yourself. (I mean if you’re into silly crafting like I am of course.) It wasn’t very messy, so don’t let that scare you away. I think the only offensive thing might be the stinky ties that I bought at a local thrift store. They were cheap and stained but boiling water kills germs so no worries there.

First you get some ties and deconstruct them so that you can use the silk (they have to be 100% silk ties, no poly-blends). The directions are much better in the linked tutorial above so I’m just going to gloss over the steps quickly and add my two cents. You pretty much can only use the bottom portion of the tie because that’s the only spot big enough to wrap up an egg completely.
I also had some silk pajama pants that someone had given me ages ago to make lumpy cats out of so I used those too and they worked marvelously. Anything silk will work. I really wanted to cut up one of my Chinese silk shirts but I love my shirts too much so they stayed in the closet. Maybe someday I’ll buy some kimono silk just for egg dying. That would be really really pretty for eggs with Asian flair.

Next we wrapped up the eggs in the silk and tied them with a piece of string.
Actually I left out a funny detail. Earlier in the day I had boiled a whole dozen eggs, thinking I would get a jump start on the process. Then later when Bug was taking her nap, I finally sat down and read the directions. That’s when I noticed that the recipe called for RAW eggs. Doh. I always do this. It pays to read ahead.
I hemmed and hawed over what to do and finally sent off an email to the site asking them what I should do. I never expected a response because I’m a blogger and I hardly ever get to my emails in a timely manner. I figured I was screwed.
What do you know, a few moments later an email popped into my inbox saying not to worry about re-boiling the eggs because the only concern would be that they would be inedible which they are anyway because the dyes from the ties could be toxic. Good to know! So I’ve learned three things: it’s okay to re-boil eggs if you don’t intend to eat them, clothing dye can be toxic to eat and it’s really nice to answer your emails right away. I’ll have to work on that last one.

After the eggs were tied up in their silk squares, we wrapped them again with scraps of an old t-shirt that I also bought at the same thrift store. Thrift stores are so handy! I need to shop them more often. This whole craft (plus a bunny rabbit that Bug refused to put down) cost me about six bucks. I’m sure you could spend way less but for some reason my thrift store sells ties for two dollars instead of fifty cents. I guess it’s a high end thrift store. Ha ha.


While we waited for the silk-tied eggs to boil for 25 minutes, we made the other kind of tie-dyed eggs—the scary kind with real food coloring that gets all over your hands and turns you into a swamp monster for 24 hours. I’ve never had much luck with putting drops of dye in water and then dunking eggs. I’ve never bought one of those kits either. When I read about this method of just squeezing drops of food coloring directly onto the eggs and then swirling them around in a colander, I was sold. It worked great and the color was very vivid, which I love.
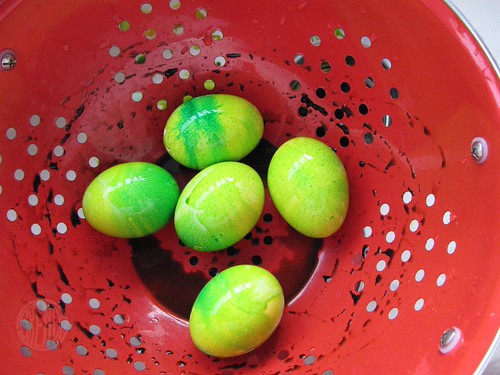
As you can see, we used some neon green dye liberally. Like Bethany twittered, it is pretty ironic that the bright green toxic-looking eggs are totally harmless to eat, while the soft pretty-looking tie-dyed eggs are probably not a good idea to eat. I don’t think they will kill you or make you sick but I also don’t think they would be FDA-approved. I know it’s a waste of eggs but I think it’s worth it for the pretty centerpiece they will be later.


Twenty-five minutes is a long time in Toddlerland so we also made some cookies while we waited for the eggs to cook and then cool.

Besides, I like to go big when I make messes. And like I said, the silk dyeing wasn’t all that messy.

Finally, the eggs were cool enough to touch and then the unwrapping process began. This is by far the best part of the whole project. You just never know what the eggs are going to turn out like. Some were bright and pretty, others were soft and muted. In some places the patterns took perfectly while in other places (where the fabric was likely folded) the colors swirled.

This was from a dark colored purply-blue striped tie.

This was from an M.C. Escher tie. I sort of felt bad about cutting this tie up but it was stained, probably from somebody dripping gravy on it during a Sunday dinner so I got over that.

The pink tie turned out the most exciting, I think.


All in all they were super fun. I’m going to be collecting silk ties from now on. If you have any neat ones, save them for me!
